Lightburn Software Manual for xTool D1 Pro
Laser engravers such as the xTool D1 Pro require software to control their movements, power, and speed settings using a Computer Numerical Control programming language called gcode.
There are several software packages out there that can interpret and perform these functions but Lightburn software is generally believed to be the best and most powerful design, layout, and control software currently available for laser engraving and cutting operations.
In this article, we will guide you on how to use Lightburn software to control xTool D1 Pro.
In This Article
- What does LightBurn software do?
- What types of laser engravers and cutters are compatible with Lightburn?
- Can I get LightBurn for free?
- What files can LightBurn use?
- Lightburn software features
- Lightburn software manual for xTool D1 pro
What Does LightBurn Software Do?
Lightburn is an extremely powerful design platform that can import many different types of files for engraving or cutting, or a user can create their own project within the Lightburn software using its suite of editing tools. With Lightburn a user can control all aspects of their engraving and cutting project from beginning to end.
Lightburn software can be installed on Windows, Mac, or Linux, and it does not require internet access to be utilized.
What Types of Laser Engravers and Cutters are Compatible with Lightburn?
Lightburn supports the xTool D1 Pro which is a GRBL gcode based controller. Lightburn also supports other gcode controllers such as Smoothieware, Grbl-LPC, and Marlin.
Other controllers such as Ruida, Trocen, TopWisdom are also supported. Lightburn does not support M2-Nano controllers which are commonly found in K40 lasers. The K40 is a popular CO2 laser engraver and its control card must be upgraded to work with Lightburn.
Can I Get LightBurn for Free?
Lightburn is not free, however, it can be downloaded and used for 30 days before the trial period expires. The download is 100% functional and not crippled in any manner. After 30 days it must be purchased.
The xTool D1 Pro requires the gcode license key version which costs $60. Once you purchase Lightburn, it is functional forever, however free updates are only provided for one year. Renewal fees are $30 per year after the initial one-year period.
The purchased license can be used on 2 computers. If you require it to be on 3 computers you can just email Lightburn support and request a 3rd seat which they will provide for free. Additional seats can be purchased if required.
The DSP license key version costs $120 and if you already own the gcode version it can be unlocked to the DSP version for an additional $60. The Galvo license key costs $150 and other versions can be unlocked for an additional $90.
What Files Can LightBurn Use?
Lightburn can import and use the most common vector or image formats such as AI, PDF, SVG, DXF, PLT, PNG, JPG, GIF, and BMP. While just about any image can be imported, be careful not to use copyrighted images for profit without permission.
Lightburn Software Features
Lightburn has many powerful editing and design features such as Node Editing, Boolean Operations, Welding, and offsetting. Each vector or image can be placed on its own layer and almost any parameter you can imagine for engraving and cutting can be manipulated. Power, speed, lines per inch, dither, flood fill, number of passes, etc. can all be controlled. And there are even more settings that can be controlled. Almost too many to mention here.
Once your design elements are configured you can then send your job directly to your connected laser. There are many included tools to properly position and align your project to ensure your laser output lands exactly where you intend it to land.
To demonstrate we’ll do a simple project below that uses a few of the design elements we’ve discussed so far.
Lightburn Software Manual for xTool D1 Pro
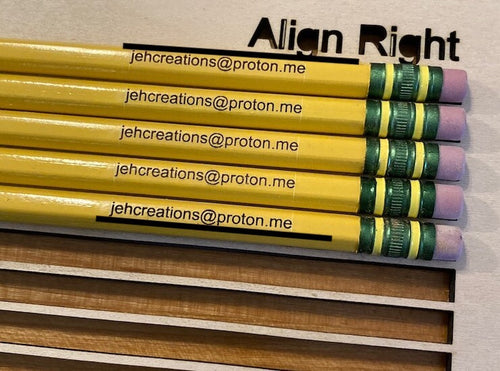
One fun engraving project is to personalize pencils. They make good gifts for students, teachers and heck, just about anyone. Let’s design and make a template to align and engrave on multiple pencils at one time.
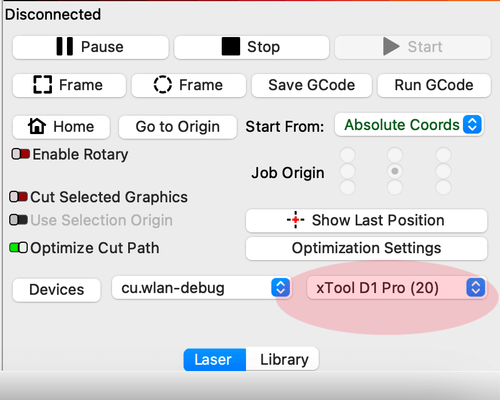
First open Lightburn and select your xTool D1 Pro device. This ensures that the home position will be correct, which is in the rear left corner. Designing with another laser layout can cause your design to mirror or flip if the orientation is different.
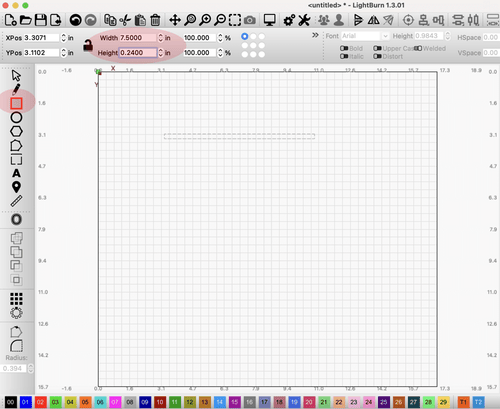
Once that is set, simply draw a rectangle of any size in the layout area and adjust its size in the highlighted boxes. Set the width to 7.5 inches and the height to 0.24 inches. Make sure the lock to the left of those parameters is unlocked.
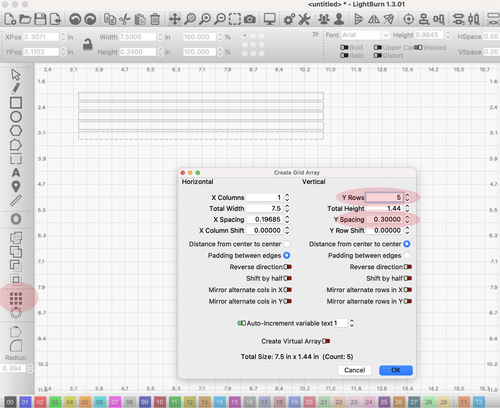
Now click on the Array Tool near the bottom left. Set your Y rows to 5 (or however many you wish to create). You can also create additional columns as well but for now we’ll just stick with 1 column and 5 rows to keep it simple. Also, set your Y spacing to 0.3 inches (or more). I like 0.3 because it keeps the design compact and the pencils fit nicely.
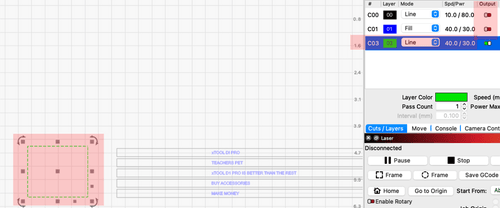
Now let’s hit Command +A (on Mac, CTL +A on Windows) to select all boxes. This puts them on a layer Mine is C00. This is where you establish your cut and speed parameters.
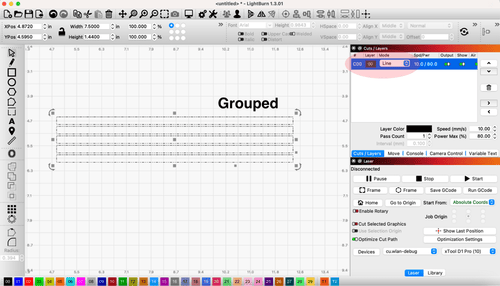
We want to cut out all these rectangles. Your cut speed and power is variable here based on your choice of material, and how thick it is. Make sure you set these variables sufficient to cut through your material. And ensure your cut is set to “Line”.
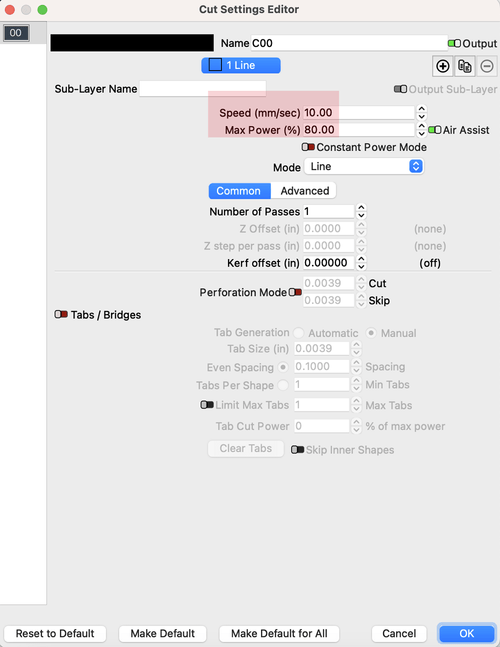
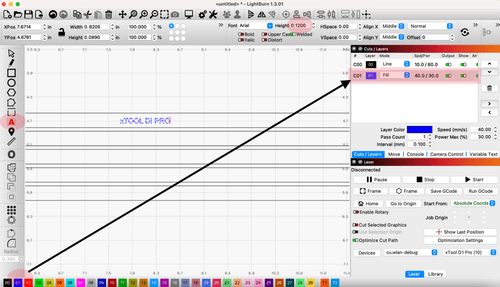
Hit OK to proceed. Now let’s add some text. Click the text icon on the left and set the height of whatever font you select to 0.12”. Now put the text on its own layer and set it to “Fill”. Again set your engraving parameters for what you know will give you the best results.
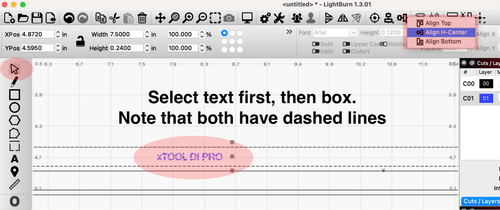
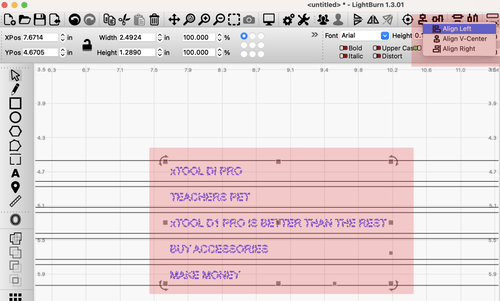
Now click the arrow on the top of the tool bar and it will select your text. Hold the Shift Key and select the box you drag the text into. MAKE SURE TO SELECT THE TEXT BEFORE SELECTING THE BOX. This ensures the text will move and not the box. We already set the box distance and it needs to stay where it is. Hit “Align Selected Objects Horizontally” and then select “Align H Center”. This centers the text in the box.
Repeat this step until you have all 5 boxes filled. Then select all text and align them Vertically. This time I aligned mine with a Left Orientation. You can center or align right. Whatever you want.
Now you have text which is centered in your pencil boxes. You also have two layers. One which will cut out the pencil boxes, and one which engraves text. Once you run your cut operation you can then disable that layer since you only need to do that operation once.
Let’s do one more thing which will aid in alignment. Let’s add a rectangle off to the side and put in on a separate layer. We’ll use this rectangle to frame our board to aid in perfect alignment for the engraving operation.
Set your speed and power of the frame box according to your material to get a visible engraving. Also note that in order to frame the box out we have set the Output of the other layers to off. This way it will only frame the rectangle I have highlighted.
PRO TIP: When first aligning your box for framing select the box and then go to Arrange > Move Laser To Selection > Move Laser To Lower Left Of Selection.

Now you are somewhat aligned and can begin framing operations until you have it perfectly aligned.
We got just a little ahead of ourselves there. If you want to you can engrave something descriptive on the template such as “#2 Pencil Jig” or you can create another box around the whole thing to cut the template to a usable size. It’s probably just best to have a pre-cut piece of wood the size that you need. Just trying to keep things simple for this tutorial.
Now turn off the text layer and run your cut layer and your frame box engraving layer. Voila! Your template is made.
To engrave on your pencils simply place them in the cut out slots, align your template with the frame box. Then ensure only the text layer is set to output and hit “Start”
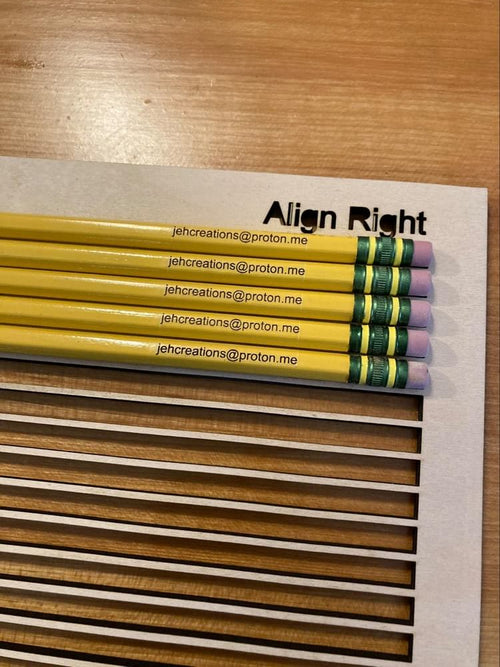
PRO TIP #2: Set your framing speed SLOW so you can watch carefully. The framing should occur on the very top of the hexagonal surface that is upwards facing and at the bottom of the last one as depicted by the black lines I inserted in the image below. Make minor adjustments if you need to. You might screw up a pencil or two in the beginning but once you learn all the alignment tricks you’ll be good to go for future pencil making fun.
As you can see, Lightburn is a very powerful design package that can even create templates for multiple, repetitious items. This makes you more efficient, and efficiency equals $$$$.
Just as your laser is a very capable tool, so is the software that drives it.
For more questions. Please join our Facebook group to get inspired!

Related Posts
How to Cut Plexiglass? What is the Best Plexiglass Cutter?
![How to Print Photo on Wood with a Laser Engraver? [Ultimate Guide]](http://www.xtool.eu/cdn/shop/articles/001_665ea6dd-45b7-417c-a58d-134bb12098f0.jpg?v=1683871230)
How to Print Photo on Wood with a Laser Engraver? [Ultimate Guide]