
Laser Engraver Maintenance - Take xTool D1 Pro 20W
So you found your side hustle. Like so many people these days, the thought of working from home and being your own boss is very appealing. One easy and fun way to accomplish this goal is to purchase a laser engraver such as the xTool D1 Pro.
So you buy one, and then you realize you have never done anything like this before. Even with the best of directions building the machine is a bit challenging. Figuring out the software and setting up your first project is even more challenging, but you manage to work through it.
Then the next thing you know you are making some cool widgets that people actually want to buy from you. Then you make more, and then more and just when you are getting into your groove, you notice the circles you are engraving are looking a bit lopsided and fuzzy.
The machine isn’t engraving as well as it used to. You need to increase your power settings to get similar results but things are not as crisp as they used to be. Then the unthinkable happens. Your machine stops working, or your lens cracks.
It is at this point that you realize there is an entire aspect of owning a laser that you completely ignored.
Maintenance.
In This Article
- Why Laser Engraver/Cutter Needs Maintenance?
- Laser Opatics
- Belt Tension Inspection
- Lubrication
- General Cleanliness
- Conclusion
Why Laser Engraver / Cutter Needs Maintenance?
A laser is a fairly complex device that has several notable features.
First of all, parts of it move making it a mechanical device. Commands are sent via a computer control board making it also an electronic device. An energy beam is then focused through a precision lens making it an optical device as well.
If you aren’t a mechanic, or an electronics technician, or an optics expert you have a few things to learn. And while it might seem daunting at first some simple maintenance procedures can keep your laser operating like new.
If you own a laser there is a fair chance that you belong to a user forum. On at least a weekly basis you’ll see several cries for help from users whose laser machine is not performing correctly.
Many of these incidents can be directly tied to regular maintenance not being performed.
We would like to make the comparison of being a laser operator to being an old machinist with decades of experience. The true artisan operates methodically, and carefully and always inspects their equipment before and after each use.
A laser as much as any tool you will own requires frequent inspections with good attention to detail being taken by the operator.
Simply loading up one piece of material after the other and doing continual work without performing regular maintenance is a recipe for disaster.
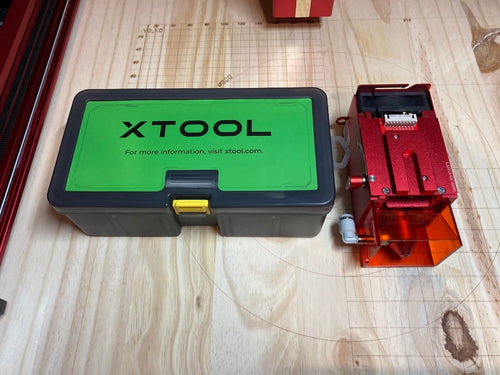
We’ll start with optics and we’ll be using the xTool D1 Pro 20 watt module as our example. And I strongly recommend to users that they buy the Laser Parts Kit for the model laser that you own. This is a business investment, remember?
Laser Opatics
Lasers generate a lot of energy and heat. That energy beam must be focused, and of the utmost importance is that the optical pathway of the laser beam be maintained in as clean a condition as possible.
Burning wood releases dusts and gases that can rapidly contaminate the surface of your laser lens. When that high energy beam hits those contaminants, bad things happen to the optical surfaces.
Diode lasers don’t typically have removable lenses. Damage to the lens is therefore catastrophic and expensive. One of the advantages of xTool D1 Pro 20 watt laser is that xTool has engineered a removable Lens Protector which provides a glass barrier to the actual lens focusing mechanism.

xTool D1 Pro 20W Productivity Kit-Advanced

As someone with a few years of experience with diode lasers and as someone with an entire career involved in Aircraft Optical Landing Aids, I can state that the addition of the lens protector is an absolutely brilliant engineering design and in addition to providing protection to the actual focusing lens, it makes cleaning and maintenance a breeze.
How to maintain laser optics?
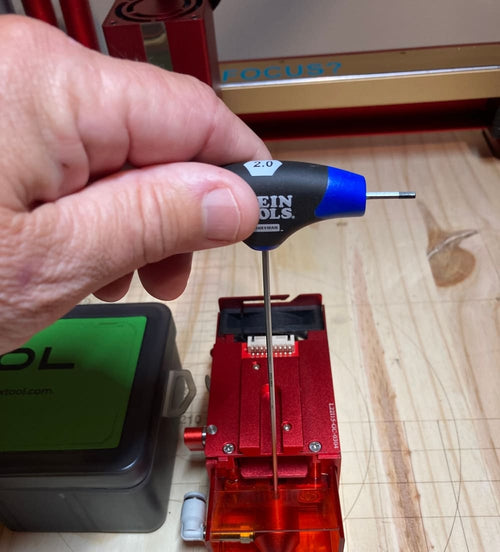
Step 1: Remove the nozzle assembly and inspect the protective lens cover
The lens and protective lens are covered by the nozzle assembly which must be removed with a 2mm allen wrench to obtain access to this area for inspection and cleaning.
This should be done after approximately 1 hour of laser run time and any time you suspect you had a high flame from cutting, or a noticeable buildup of dust on the nozzle assembly.
Or inspection should be completed following any wood burning operations which produce excessive smoke or gases.
Failure to do this will eventually lead to a lens failure.
I want to state that I am a very careful operator but you will notice some minor heat discoloration on the protective lens cover.

No matter how careful you are or how much you inspect, heat happens. Smoke happens. In the D1 Pro 20 watt kit, xTool provides you a spare protective lens cover.
In the aforementioned Laser Parts Kit (for the 20 watt) it also contains one.
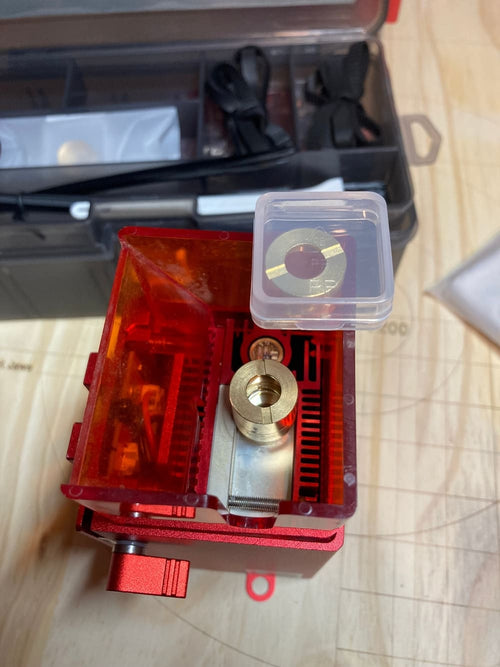
Step 2: Inspect and clean both the protective lens and actual lens
Next you’ll want to remove and carefully inspect the protective lens for any sign of dirt, dust, contamination, or discoloration. Then inspect the actual lens.
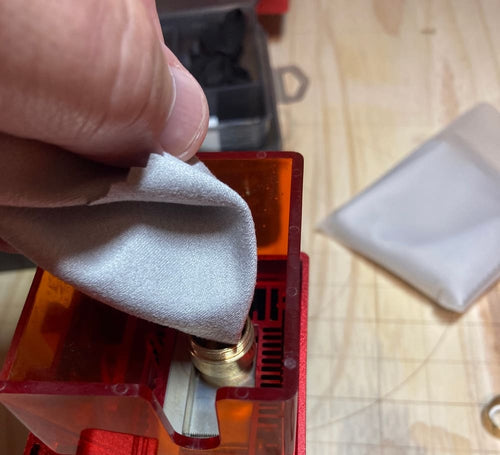
Clean both with the provided optical cleaning cloth and a small amount of isopropyl alcohol (91%).
You’ll note that my protective lens has a small area of discoloration. This cannot be removed by cleaning. This likely happened from a flare up, or a long engraving session with a lot of heat, gas, and smoke generated. Or a contaminant was present on the lens while engraving.
While I plan on continuing to use this protective lens until I note any engraving deficiencies, I do have 2 spares available to me and I’ll replace this if I take note of a worsening condition.

Now inspect and clean the lens if required.
Step 3: Reinstall
Reinstall the protective lens and clean and reassemble the nozzle. The important thing to note here is that a protective lens is provided. It is a consumable item that is easily replaced.
Failure to maintain cleanliness or replace the cover when necessary can lead to catastrophic failure of your diode lens assembly. Regular inspection and cleaning is a necessity and will provide you with an always ready machine that will be reliable when you need it to be.
Belt Tension Inspection
The belts should be inspected regularly for proper alignment and tension. While there are several ways to inspect tension, including using expensive tooling, that isn’t really necessary in this instance.
Here’s what I like to do.
Grip the belt between your thumb and forefinger, close your eyes and compress ever so lightly. Repeat on the other side. You’ll be able to feel any large differences in belt tension.

The tension doesn’t have to be perfect but it should be as close on both sides as you can get it.
Don’t forget there is a belt that drives the laser head as well. It doesn’t have to be the same tension as the other two belts. They work together but the X movement belt works alone. It should just have good tension.
Proper tension should have been set during assembly but you should check it from time to time, especially if you have any engraving that becomes fuzzy or erratic in shape.
Once you verify tension, turn the machine on and slowly move the laser head around while watching the belts move. They should move together and neither belt should roll in or out. Just make sure they are tracking okay.
Lubrication
After you verify the belts are tracking correctly, run a very thin bead of grease (included in The Laser Parts Kit) or use some light petroleum grease to coat the rails.

Do not over apply the grease and be sure to apply to all 3 rails. (Right and Left Y, and the X rail).
Again, start the machine and move the laser head around to ensure proper, smooth movements are being obtained.
And now we’ll move on to our last section.
General Cleanliness
Lastly we want to remove any dust buildup from the laser head fan and ensure the main control board is clean. Ensure the machine is unplugged.
Due to the movement of the fan static forces will cause dust attraction. Excessive dust build up will prevent proper cooling of the diode laser head assembly. Using a small brush or a can of compressed air, gently remove the dust buildup.
Do not use high pressure air on either the fan or the main control board.
Inspect the main board for dust contamination or contaminants. Note that computer electronics are susceptible to Electro Static Discharge (ESD) damage and should be cleaned with the mildest possible method.
Power should be removed and only light brushing or very gentle canned air should be used to remove dust and debris. No liquid cleaners should be used on the laser head fan or the motherboard.
Conclusion
Your laser is an expensive investment that should be properly maintained to prevent costly failures or downtime. Basic maintenance such as:
- Optical cleaning
- Replacement of protective lens (if required)
- Belt tensioning
- Lubrication
- General cleanliness
will keep your laser in good working order.
Before each laser operation you should make a brief inspection of your machine and correct any deficiencies noted, especially the cleanliness of the optical surfaces and its proper alignment to the working surface.
For more questions. Please join our Facebook group to get inspired!

Related Posts

What Is Screen Printing: The Ultimate Guide

Laserclassificatie en laserveiligheid
![Laser Cutting Paper: The Ultimate Guide [2023]](http://www.xtool.eu/cdn/shop/articles/001_520x500_8b573316-9cbf-4e67-ac4f-19897c63b1a7.jpg?v=1683873841)
