How To Make a Laser-Engraved Thanksgiving Charcuterie Board
Thanksgiving is around the corner. The Thanksgiving dinner is a great moment to share our gratitude with family and friends.
So to make something special for it, today we’re here with a simple, quick, and easy-to-follow guide to making a custom Thanksgiving charcuterie board with a laser engraver, xTool D1 Pro.

If you are running a small business, you can also add it and other customized items to your inventory to jack up your sales during the holiday season. Without further ado, let's get started!
Things You Will Need
- Laser engraver: xTool D1 Pro (20W)
- Laptop
- Wooden charcuterie board with knife and fork
- Honeycomb
- Goggle

6 Steps to Make a Charcuterie Board for Thanksgiving
Step 1: Set the Focus for the Laser Module
Firstly, put a honeycomb underneath the charcuterie board to protect your table.
Then put the focal length setting bar down, loosen the thumb screw on the other side, and slowly move the laser module down until the tip of the setting bar touches the surface of your charcuterie board. After that, remember to fix the screw and put the setting bar back.

Measuring the focus is paramount for engraving using xTool D1 Pro, otherwise, your laser module wouldn’t work properly and the engraving results will be blurry and sometimes there’s even no trace at all. So make sure the charcuterie board parallels the frame of the machine.

Step 2: Set the Engraving Positioning
Next, you need to set up the engraving positioning, which determines where you start the engraving.
Firstly, turn on the switch, then you will see the red cross on the surface of the board. Then you want to make sure the pattern is engraved right on the center of the board.


But how to find the center? Just move the module to the handle of the charcuterie board, as this area is smaller, which is easier for you to find the middle of the board. Then slowly move it back.

Step 3: Connecting with Software
Firstly, open the software, xTool Creative Space. Then find the project center. There are so many amazing projects for you to choose from. Let’s choose the charcuterie board for Thanksgiving. Click "Start" to import it.
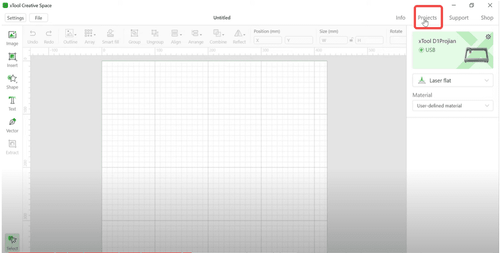

Then, you’ll need to connect your laptop to your D1 Pro.
Step 4: Material Settings
Adjust the engraving settings as follow.
- Laser flat
- User-defined material
- Power (%): 100
- Speed (mm/s): 250
- Pass: 1
- Sharpness: full
- Grayscale: full

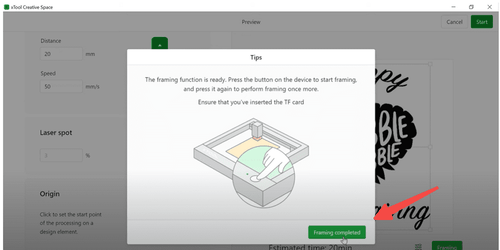
Step 5: Framing
Hit the “Process”, and make sure to choose the middle as the starting point on the next interface.

Hit the “Framing” and press the start button of the machine, and the framing is completed.

Step 6: Engraving
Hit "Start", and push the button of the machine. We’re all set!

Your Thanksgiving charcuterie board is finished!

xTool D1 Pro 20W Productivity Kit-Advanced

For more questions. Please join our Facebook group to get inspired!