Getting Started With xTool D1 Pro
You got you a brand new xTool D1 Pro Laser Engraver. But now you have no real idea what to do first or how to get started.

Building and using a laser engraver is a daunting challenge if you have never done anything like this before. Quite frankly it can be a little scary. The first thing you need to know is that learning the art of laser engraving requires lots of patience and also requires ruining a whole bunch of scrap material before you turn yourself loose into the world of “side hustle”.
So many people build the laser and then lay an expensive piece of wood down, or even worse, a $40 Yeti cup only to watch as the text or logo they want to apply starts engraving upside down and backwards.
The user forums are full of such sad tales. And if you read the user forums long enough you’ll see this: “I only left the room for a minute, and then the fire started”.
It’s important to jump into this endeavor patiently, and responsibly.
Read the manual and watch assembly videos before assembling your machine
Before you get started you really should read the manual in its entirety and you should probably watch the assembly video once or twice before thinking about even tightening the first screw. There are many assembly videos online with some users showing useful tips and tricks that aid in assembly.
Double check all electronics connectors prior to powering up
Plan on assembly taking an hour or two. Before you connect to the machine take a quick assessment of what you’ve done and reinspect that all the electrical connectors are properly installed and seated correctly. The user forums are also full of “my machine only goes back and forth and not up and down” posts as well.
Before you connect to a computer you need to ensure that you have a piece of scrap wood or thick cardboard laying under the machine. Push the wrong button and engrave the top of your wife’s dinner table and you’ll be dead meat.
Start with the xTool Creative Space software
I strongly recommend downloading and using the xTool Creative Space (XCS) software for your first time lighting up the machine for a couple of reasons. First of all is that the XCS software is able to check and update your machines firmware which is vital before getting started.

Check and upgrade firmware
Secondly, all of the parameters of the machine size and orientation are already preconfigured. Once you make sure your machine is working and you want to move towards some more advanced laser software such as Lightburn, you can but for now lets play it safe.
Before you even think about beginning a project you should get a piece of scrap wood or thick cardboard and start simple by engraving a single letter or a number.
Ensure the machine size (Laser Flat) is selected
Set the Output to “Score” and use low power and quicker speeds. Ensure the machine size is set correctly as well. The example is set to “Laser Flat”.
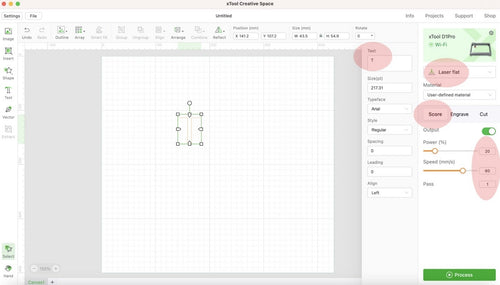
In the example above we have used 20% power and 60 mm/sec speed. Ensure you have the material to be marked under the laser and that the laser is focused properly by using the built in focus tool.
Then hit the Process button on the bottom righthand corner.
Now we’ll Frame our letter T and that will send the laser head to where the T is located in the workspace. Right at this moment we don’t care where that location is. We just want to test our machine.
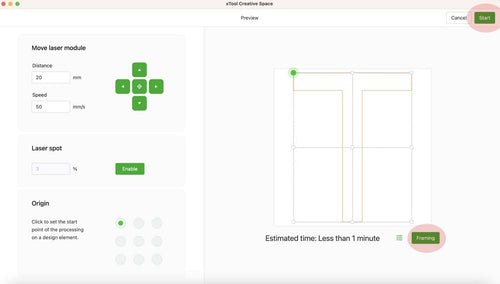
When you hit the Framing button it will instruct you to push the button on top of your xTool D1 Pro. Then the framing operation will begin. You can do this as many times as you need to.
Once you have determined that your material to engrave is under where the laser framing operation is then you can hit the “Start” button in the top righthand corner. Once again you will be prompted to hit the button the xTool D1 Pro to begin. Make sure you have your laser safety glasses on.
Play around with different speed and power settings
Depending on what material you have under the laser, 20% power and 60 mm/sec speed may barely score your material. If you can’t see your “T” then try 25% power and 55 mm/sec speed. Keep doing this until you get the results that YOU want to see.
Once you have become the Master of The “T” then it is time to move on to something more complicated like the entire word “TEST”. Then from scoring the letters you can set them to engrave which will fill in the letters. As always, start with low power and fast speed.
Test on different materials
If you started with a piece of cardboard, now it is time to move on to a piece of scrap wood. Again, start with low power and faster speeds and slowly dial the settings to achieve the look you are shooting for.
You may think that what is discussed next should have been mentioned first, but you’d be wrong. You need to develop a rudimentary understanding of how different speeds and power settings affect both scoring and engraving different materials before you use some reference settings. Without this basic understanding you are setting yourself up for failure.
Try xTool Reference settings
Under your setup, on the main page of XCS there is a dropdown box for “Material”. As an example “Cherry Plywood” has been selected.

This auto fills your power setting at 50% and sets your speed at 30 mm/sec.
These settings come from the xTool Selected Reference and while they might score and engrave perfectly, the new user should consider them to be good starting points.
Play around on a piece of scrap Cherry Plywood (or whatever material you have selected) and make MINOR adjustments in the speeds and power settings.
This way you will achieve the look that is most appealing to you.
Also take copious notes while you are working through this process. That way in a week from now when you are engraving Cherry Plywood you’ll know what settings looked the best to you.
I strongly encourage all new users to take this, or a similar approach to getting started.

For more questions. Please join our Facebook group to get inspired!

Related Posts

How To Start A Jewelry business in 5 steps

Cool Pumpkin Craft Ideas for Fall 2024